Forms
November 2023 State
Agenda
- Reactive Forms - A Recap
- Custom Form Controls
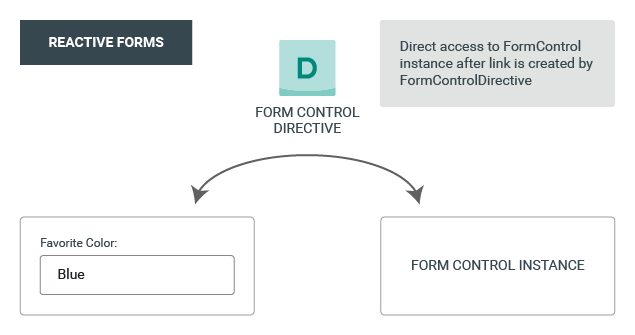
Reactive Forms
Reactive Forms
The form model defined in code as the source of truth
- Scalable, reusable and testable
- They are synchronous
- They are immutable
Reactive Forms
Example
interface LoginFormModel {
  email: FormControl<string | null>;
}
@Component({
  selector: "app-login",
  template: `
  <form [formGroup]="loginForm" (submit)="submit()">
    <input type="email" formControlName="email">
    <input type="submit" value="submit">
  </form>
  `
})
export class LoginComponent implements OnInit {
  loginForm: FormGroup<LoginFormModel>;

  ngOnInit() {
    this.loginForm = new FormGroup({
      email: new FormControl()
    });
  }

  submit() {
    console.log(this.loginForm.value);
  }

}
Reactive Forms
see angular.io
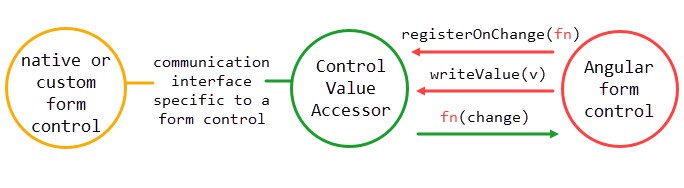
Control Value Accessor (CVA)
Enables Custom Form Control
- "[...] interface that acts as a bridge between the Angular forms API and a native element in the DOM." (see angular.io)
- Propagates changes from the model to the view and from the view to the model
Control Value Accessor (CVA)
CVA: Use Cases
With the Control Value Accessor we can
- Create reusable, non-native form controls
- Implement a core component library exposing form controls
- Wrap web components without forms support
- Divide complex forms into manageable, maintainable parts
Create reusable form controls
A "star" rating control

- Not natively supported control
- Could have an implementation similar to
@Component({
    selector: "app-rate",
    template: `
       <form (submit)="submit()">
         Rate this training: <app-star-input (changeRating)="rating = $event"></app-star-input>
         <input type="submit" value="submit">
       </form>
    `
  })
  export class RateComponent implements OnInit {
    rating: number;

    ngOnInit() {
    }

    submit() {
      console.log(this.rating);
    }
  }
But do we want that...?
Implementing CVA
interface RatingFormModel {
  rating: FormControl<number | null>;
}
@Component({
    selector: "app-rate",
    template: `
       <form [formGroup]="ratingForm" (submit)="submit()">
         Rate this training: <app-star-input formControlName="rating"></app-star-input>
         <input type="submit" value="submit">
       </form>
    `
  })
  export class RateComponent implements OnInit {
    ratingForm: FormGroup<RatingFormModel>;

    ngOnInit() {
      this.ratingForm = new FormGroup({
           rating: new FormControl()
      });
    }

    submit() {
      console.log(this.ratingForm.value);
    }
  }
Control Value Accessor
API
interface ControlValueAccessor {
    // is the method that writes a new value from the form model
    // into the view or (if needed) DOM property
    writeValue(obj: any)
    // is a method that registers a handler that should be called
    // when something in the view has changed
    registerOnChange(fn: any)
    // it registers a handler specifically for when a control receives
    // a touch event
    registerOnTouched(fn: any)
    // is called when we disable or enable the form control. Can be used
    // to propagate the change to child components
    setDisabledState?(isDisabled: boolean): void;
}
Control Value Accessor
Implementation steps
- Implement ControlValueAccessor interface and implement its methods
- Register ControlValueAccessor (in a Component)
providers: [
    {
      provide: NG_VALUE_ACCESSOR,
      useExisting: forwardRef(() => CustomComponent),
      multi: true
    }
  ]
Implementing the interface in our custom component
@Component({
    selector: 'app-rating',
    providers: [
        {
            provide: NG_VALUE_ACCESSOR,
            useExisting: forwardRef(() => RatingComponent),
            multi: true
        }
    ],
    templateUrl: './rating.component.html'
})
export class RatingComponent implements ControlValueAccessor {
    rating = 0;
    isDisabled = false;

    private onChange = (rating: number) => {};
    private onTouched = () => {};

    writeValue(rating: number) {
        this.rating = rating;
    }

    registerOnChange(fn: (rating: number) => void) {
        this.onChange = fn;
    }

    registerOnTouched(fn: () => void) {
        this.onTouched = fn;
    }

    setDisabledState(isDisabled: boolean) {
        this.isDisabled = isDisabled;
    }
}
Control Value Accessor
Exercise (1/5)
- Pull or fork a repository from here
- Check out the rating/1-baseline state
- Familiarize yourself with the code
Control Value Accessor
Exercise (2/5)
We want to refactor the RatingComponent to implement the CVA interface.
- Implement the ControlValueAccessor interface for the RatingComponent class
- Remove Input/Output properties
- Remove Input/Output bindings. Directly bind to the FormControl using the formControlName directive
Control Value Accessor
Exercise (3/5)
- Add a required validator to the rating form control
- Add a checkbox for the user to opt-out of the rating:
- When the checkbox is checked, disable and reset the rating control
- When the checkbox is unchecked, enable the rating control
- Test your application. See, how the reactive forms handle enabled/disabled state in combination with validation
fallback branch: rating/2-implement-cva
Add validation & opt-out
Control Value Accessor
Exercise (4/5)
- Add another control to the form group for an overall site rating
- Reuse the RatingComponent
fallback branch: rating/3-validation-opt-out
Reuse the custom control
Control Value Accessor
Exercise (5/5)
- Add a custom validator to the "registration rating" (not overall site rating) form control to only allow ratings greater than 3
- Show a validation message if the custom validation failed and the control was touched by the user
fallback branch: rating/4-reusability
Add custom validation
final solution branch: rating/5-custom-validation
Nested Forms
With Control Value Accessor
- Pro: Reusable & portable
- Pro: Best practice (Google)
- Pro: Supports many nested levels
- Cons: Implement interface
Nested Forms
Validation
For Re-validation, the validators will need to be on the top-level form, not at the child component, if you want it to be part of the parent forms validation.
Nested Forms
Validator API
interface Validator {
    // is the method that is called for validation
    validate(control: AbstractControl): ValidationErrors | null
}
Nested Forms
Validator implementation steps
- Implement Validator interface and implement its methods
- Register Validator (in a Component)
providers: [
    {
      provide: NG_VALIDATORS,
      useExisting: forwardRef(() => CustomComponent),
      multi: true
    }
  ]
Implementing the interface for a nested form
@Component({
    selector: 'app-address',
    providers: [
        { /* CVA provider */ },
        {
            provide: NG_VALIDATORS,
            useExisting: forwardRef(() => AddressComponent),
            multi: true
        }
    ],
    templateUrl: './address.component.html'
})
export class AddressComponent implements ControlValueAccessor, Validator {
    addressForm: FormGroup<AddressFormModel>;

    validate(): ValidationErrors | null {
        return addressForm.valid ? null : { invalidAddressData: true };
    }

    // CVA implementation starts here...
}
Nested Forms
Exercise (1/5)
- Pull or fork a repository from here
- Make sure you are on the master branch
- We will focus on order
- Add address properties to form
- street, zip, city, country
Nested Forms
Exercise (2/5)
fallback branch: nested/1-including-address
- prepare address
- generate address component
- move forms part of address to component
Nested Forms
Exercise (3/5)
fallback branch: nested/2-extracted-address
- implement CVA interface to address
- In writeValue use setValue and set emitEvent as false (good for the performance)
Nested Forms
Exercise (4/5)
fallback branch: nested/3-basic-cva-implementation
- refactor general address to invoice address & delivery address in order
Nested Forms
Exercise (5/5) - Optionals
fallback branch: nested/4-introducing-delivery-and-invoice-address
- add validators to form
- add validation to address component
solution branch: nested/5-added-validator